

Supplies:
Wash cloth
Spray paint (2 cans is what it took me)
Fleeced back table cloth (1 yd)
Quilting batting or a thin layer of foam
Staple gun + 1/4 6mm staples
Screw driver
Step one
Clean the whole table down, then flip it over carefully and remove all the screws from the top part of the table.

Repeat this step for the chairs. I put all my screws in a Baggie and stashed them some where safe. (I have a habit of losing things.) Once you take all the screws out you will be left with metal frames.

Love my drop cloths! :)
Step 2
Time for some painting! I'm no master at spray painting, but I carefully put two-three thin coats of paint on the table then the chairs. I used valspar paint and primer in one in glossy black.
Step 3
Take the top of your table and lay it on the back side of your table cloth. For the table cloth I found this beautiful black and white damask at my local store. It was sold by the yard for 2.98. One yard worked nicely for the whole project.
Carefully cut around the table and leave about 1-2 inches extra to wrap up the side of your table.*note* I left the original princess table cover on. It added a little extra padding and prevented any staples poking through the new table cloth.
Once you have your new table cloth cut out, wrap it up the side of the table and staple it down. Make sure your pattern is even so it doesn't come out crooked. I stapled around the sides first and left the corners till the end. Make sure to pull the table cloth tight while stapling. Once you've stapled the sides down carefully pull the corners tight and staple down.

Repeat for the chairs, I added a layer of light quilting batting between the table cloth and chair to to just to add a little extra padding.
*Tip* If any on you staples feel like they are poking through just lightly hammer them down.
Step 4
It's time to attach the tops back to the metal frames. Line the table up and put all your screws back in. Do the same with the chairs.
*Note* The chairs do have backs to them. They glue on. I have one of the backs but I stashed the other back and currently can not locate it. Once I do find it I will add the additional step on how to cover and reattach them. :)
That's it! All finished!!
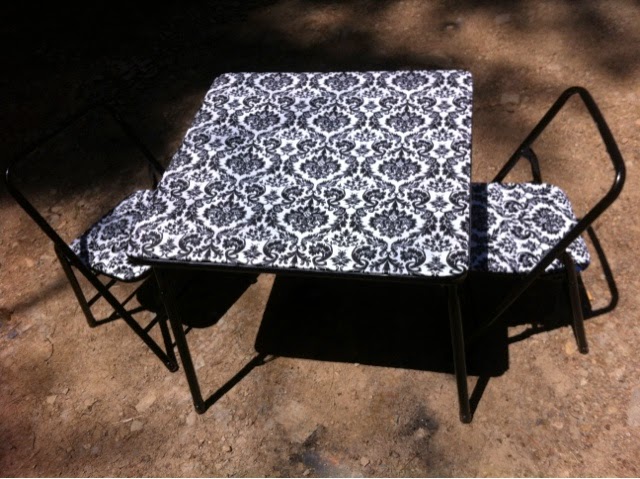
It's time for a little dress up! They loved it more then the original princess table!

The cat had to photo bomb of course!
Check back for more fun budget friendly projects.
-Elizabeth
No comments:
Post a Comment