Thursday, June 9, 2016

Plush Whimsical Deer Mount


My husband is Mr. outdoorsman. If he can spend a day in the woods or an afternoon next to a creek he's there. It's only normal for my kids to follow suit. My husband believes in teaching our kids to live off the land. Having a man in my life so rough and tough only means one thing, lots of taxidermy. To be honest I'm not the biggest fan, but he puts up with my constant crafting, and my lack of house duties. So I've learned to appreciate his hobby. When I first discovered these whimsical versions of there taxidermy counterparts I was ecstatic. 

It was the dead of winter and I spent days day dreaming this design. I could see it in my head and translated it to a pattern. 

I found this amazing mint fabric with gold hearts at Joann fabrics. After drafting my pattern I cut out the fabric pieces. I'm not gonna lie, I was nervous about this pattern being just right. If it was off even at the slightest point the whole design would look odd. 

After sewing everything here is what I got:


I added the antlers and made them out of a hot pink polka dot. I then stated making fabric and felt flowers for the head.


After attaching the flowers it was time to paint the base.


I had a helper. šŸ˜Š

After the base dried I carefully added the head to the base. I added a gator hook to the back and voila! I was finished. 
 My girls were so excited about there new piece of art work. This design took me about two weeks to draft and sew. I've considered releasing my pattern but for now I'll leave the option open for a custom one made by me. 

My online shop is www.lizzysueandher2.etsy.com

Please do not use my photos with out credit or a link back to my website. Thank you!

Wednesday, March 30, 2016

Starting a new wardrobe on just a few $$ at a time. Tips on how to find amazing clothes for amazing deals!


Did you ever look at what's trending in fashion only to notice an outrageous price tag to come along with it??! 

I love the idea of being that on trend mom, however it's hard to bring myself to spend sooo much money on just one item such as a cute new dress that is going to face sticky hands and lots of "mommy I need you" tugging moments. Let's face it, there is a reason yoga pants and t-shirts are the primary choice for us moms. 
I've come to the realization that 30 is fast approaching and everything I own has been around since before kids. I imagined my 20s style being something ripped from a vogue magazine only for it to become a sea of knit and cozy. I decided about a year and half ago it was time to start working on a new wardrobe one piece at a time. I hit two road blocks when I started, first having no self confidence. Having two kids I packed on the pounds and thought I didn't deserve to wear new beautiful clothes. I ditched that thought only to fall in love with every curve and loving who I've become. Second, being a stay at home mom funds are kinda of low. I didn't have the capability of going out and replacing everything I owned so I had to get creative and be patient.

Tip 1:
Clearance, clearance, clearance, and coupons!! 

Every time I go shopping for clothes, shoes, accessories, etc I refuse to pay full price for something. If it's not on sale, it's not happening. If I go shopping it's usually for something I really need, but sometimes I look around for something new and exciting. I've learned to shop at the end of seasons for the best deals. I also sign up for coupons through my email to get the best coupons I can get. 

Tip 2:
Thrift stores or consignment shops.

I know what your thinking, "oh my god NO". I say why not? Your recycling something and giving it a new life. Your getting items at a fraction of the cost. Not to mention some places get close outs from local stores. The one thrift shop  near me gets target close outs. Can you say jackpot?! 

Tip 3:
Yard Sales and Flea markets

This is one of the best places for amazing deals on everything from clothes to accessories. People want it gone so they mark it cheap to get rid of it fast. I've found more name brand clothes with tags still attached in my size under a $1. I can't even make clothes for that price and yes the stuff is in style. 

Tip 4:
Sew it!
If I can't buy it, I alter something to fit what I'm looking for. There is also a ton of free tutorials online on how to make your own clothes or how to alter clothes to fit just right. 

Just remember to look for clothes that compliment you and make you feel beautiful. That is the most important tip of all. 

Love yourself. <3

-Liz


Saturday, May 2, 2015

Spring 2015 the Rylee Jane

Recently I sat down with my oldest daughter who is 5 to design her easter dress. I showed her different designs and let her look through some fabric choices. Unfortunately, I didn't have time to make the dress for Easter but she had a spring fine arts nights shortly after so I drew up the design and stitched it together for that. I named this dress the Rylee Jane.   Here is the final product:


I love designing stuff, especially for my girls. My grandmother and mom use to make stuff for me growing up all the time.   I thought it appropriate to pass on the tradition. <3 

We live in such a fast pace world that it's moments I get to spend with my girls doing these little things for them that I hope sticks with them forever. 

-Elizabeth

Sunday, January 18, 2015

Stuffed Portobello Mushrooms

I LOVE food. So much that I taught myself how to cook and bake. I had a craving for stuffed mushrooms but I didn't want to buy premade ones so instead I came up my own recipe. 

They are baked pillows of goodness.

Prep: 15 mins
Bake: 25 mins

You will need:
16 oz Whole Baby portobello mushrooms or regular mushrooms 
4 oz cream cheese
4 oz spinach (I used canned)
Pinch of salt
1 garlic clove chopped or a tsp of minced
Pinch of crushed red peppers (optional)
1/2 cup shredded mozzarella cheese
1/2 cup parmasen cheese

Preheat oven to 375.

Clean mushrooms, take out steams, and chop up the steams really fine.
 
Soften your cream cheese in the microwave (it makes it easier to stir), stir in your drained spinach, salt, garlic, hot pepper, mozzarella, parmesan cheese and chopped steams. 

Using a small spoon fill your mushrooms and put in a baking pan. (I used a metal cake pan lined with foil sprayed with olive oil) I left a little room between the mushrooms so they had space to cook.

Put them in the oven. Bake 25 mins and enjoy!!!


Caution: you might eat them all in one sitting!!


Tuesday, January 13, 2015

Faux Fur Vest Tutorial for The Little Diva in Your Life!

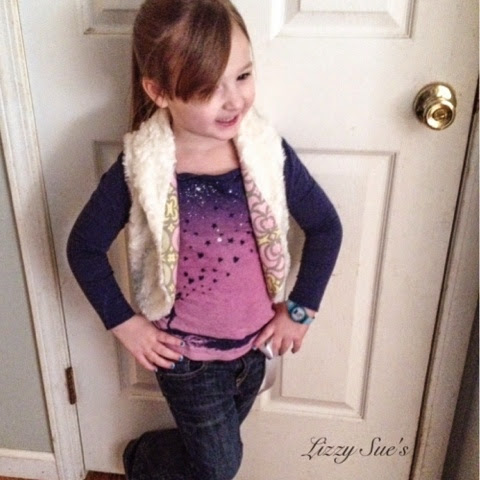
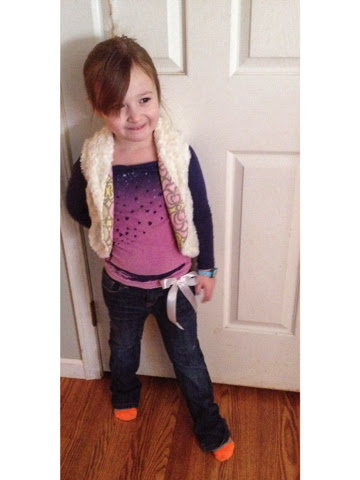
I've been obsessed with fashion trends lately and one trend I've seen lately is the faux fur vests. So I decided to make one for my oldest daughter rylee. 


Supplies:

1/2 yd faux fur or in my case minky<<<it's like wearing a blanket!!

1\2 yd cotton fabric, I used an amy butler print from my stash

Sewing supplies, machine, thread, scissors, measuring tape, pins, etc!


I started by tracing an existing sweater to make a quick pattern I added a 1/2 inch seam allowance just incase I needed to adjust the size.


also measured around the top part on my pattern to add a collar. I cut two pieces 4 inch at the widest part tampering down to a half inch on each end by 12 inches long. 
Note: You can make it wider or longer it's completely up to you. :) You just need it long enough to go around the back of the neck. 
I also included in a 1/4 inch seam allowance on both sides of the pattern.


I the cut my vest pieces out. I cut one piece for the back of the vest out, and two pieces for the front. Minky tip: flip your minky over right sides together and cut your pattern pieces out, that way everything thing is nice and even. Now cut out your lining. You just need two pieces for the front of the vest and one piece for the back.


I sewed the two pieces for the collar right sides together around the curved part and turned it right side out.  


Then I flipped the collar right side out. 

Next I sewed the shoulder seams together. Repeat for the lining.  


Then I folded the collar in half to find the middle and marked it. I did the same for the vest. I matched the two points up on the collar and back of the vest and pinned in place. I then pinned my lining and minky right sides together around the collar and sewed the whole front of the vest together up to the side seams.


 It slipped my mind to take pictures of the next few steps, so just bare with me. :)

Next I stitched the back part together of the vest to the side seams. The side seams should not be sewed together yet. (I originally did them first and ended up ripping stitching out because I found an easier way to turn the vest inside out.)


I turned the vest right side out. 

Now, I carefully went back inside the vest and matched up the right sides of the fabric and stitched together the side seams, I did the minky on each side then I did one of my lining seams. (The last seam is going to feel very awkward because your only going to sew half way up the seam and it's gonna feel like your gonna catch all the other fabric, so just take your time.) Once I did that, I tucked my seam inside and slip stitched the hole shut. 

Note: You can add a button closure or maybe a ribbon closure. On this vest I decided not to add anything and she loved it!

That's it! I my little diva loved her vest I hope yours will love it two!


 Share your photos on Instagram @lizzysueandher2.

Sunday, August 24, 2014

Not your average pencil box....with tutorial!!!


School time is almost here, for many it's the first day of school of a new year but for my oldest daughter Rylee it's the first day ever of school! It's new and exciting for her and it just means it's one step closer to my little girl growing up :( but, no more sappiness! On to the good stuff!

I was out shopping for school supplies and I wanted to keep it budget friendly. We got everything on the list including a plastic pencil box which costed a whooping .50. Rylee picked out a blue one. I wanted to give rylee a chance to spruce it up. I brainstormed a few ideas and decided mod podge and glitter it would be. Then I realized I was out of mod podge... After my oh  **** moment I had to think on my feet. Then it hit me, I use to cover wipe cases with fabric and realized that would work perfectly! I took to my fabric stash and dug out some aqua chevron (rylees favorite print and color) and I dug out some glitter ribbon.

After a little cutting, hot glueing and accessorizing here it is!!

 
She loved it!!

We filled it with school goodies!


Wanna make one??

Here are the steps:

Supplies:
You need a fat quarter of cotton fabric.
A piece of cotton batting or white felt.
Scissors
Hot glue
Ribbon
Cotton, thread, needle for rosette (optional)
AppliquƩ name (optional) I created mine on my brother embroidery machine with felt and blue thread.


First I cut a piece of fabric the size of the top of the box.

Next I cut a piece of quilting batting to fit the top of the box and hot glued it on. (This covers those raised square areas on the box and makes the top soft)


After glueing the batting down I started glueing down the chevron a little at a time making sure that the glue was hot. I had extra fabric hanging off the front so I folded it under and glued it down instead of trying to cut the extra off. I wanted to keep the chevron pattern nice and even. I finished by glueing the corners down last.


This was a great project to do with my baby girl. <3

 
It should look rough but don't worry thats why I used ribbon!

Glittery pink ribbon!
I started in the front with the ribbon and carefully glued it down. I paid special attention to the corners as I worked my way around the box. Tip: make sure to glue part of the ribbon to the plastic and the other part the fabric creating a nice clean edge.
After working around the whole box I cut a piece that is half the width of the ribbon and glue it above the tab.

Now you I have a blank canvas!

I added an appliquƩ on the top by just hot glueing it on. I also added the hand sewn flower detail by simply stitching it on. There are so many ideas or things you can add the this box to make it special!

Total cost of project: Under $5

-Lizzy Sue

Make a box??? Post a picture with hashtag: #lizzysues


Tuesday, May 27, 2014

Vintage Dining Chair Makeover!

I have been obsessed with refinishing things lately. I've been eyeing up a vintage dining room chair my mom has had forever. I decided it was time for a new sewing chair and thought it would be perfect! My mom was about to throw it out before I saved it from the trash. After a little paint and fabric it gave the chair a whole new life....

The original chair was covered in finger paint, thanks to my little artists. It was also a little rough around the edges.

It's pretty sad looking...

Supplies:
Sand paper
Spray paint
Stapler
Screw driver
1/2 yd home decor fabric


First, take the seat part off the chair and carefully sand down all the rough spots. You don't have to sand if you are using a paint and primer in one, but I wanted a nice finish so I decided to sand. :)
After sanding it's my favorite part painting!! I wiped down the chair to ensure there wasn't any dust. I then sprayed the white on in thin layers. 

*Tip* What makes spray painting really easy is a spray can holder that attaches to the can. It helps control your paint flow and your hand doesn't get tired. I found one at my craft store. :)

Now it time for the seat....
I lined my fabric up with top part of the seat so the pattern on the fabric was even. I then started stapling the fabric on to the back of the seat.
I gently pulled the fabric as I stapled so it's was nice and tight.
After stapling I just screwed the orignal screws back in and tightened all the other screws making the chair nice and sturdy and voila!! 

All finished!

It turned out gorgeous!

-Elizabeth